Loading...
Loading...
Loading...
Loading...
Loading...
Loading...
Loading...
Loading...
Loading...
FinOps Center's Installation requires configuration of your AWS Cloud Estate within the Management Account and the Delegated Admin Account where the application will be installed.
Tasks in Management Account
Create Cost and Usage Report
Create S3 Bucket for Cost and Usage Report
Create IAM Role for S3 Bucket Replication
S3 Management setup of Bucket Replication and Batch Operation (optional)
Assess Requirement
Admin - creating IAM Role
Tasks in Designated Admin
Create S3 Bucket for Bucket Replication and Frontend Application
Configure S3 Buckets
Launch and Configure QuickSight
Run/Configure RLS CUDOS CloudFormation Installation
Access Requirement
Admin - creating IAM Role
Subscribe and install FinOps Center Marketplace offering
Launch EC2 to copy FinOps Center code to S3 Bucket
Install FinOps Center from CloudFormation
https://catalog.workshops.aws/awscid/en-US/dashboards/foundational/cudos-cid-kpi/deploy
FinOps Center leverages the work from AWS CUDOS Framework that so customer can leverage the Various QuickSight Dashboards created by the OPTICS Team.
When preparing for your FinOps Center installation, it's important to consider the design aspects concerning both your Cloud Estate and the AWS Account of your FinOps Center installation.
Aligned with the Multi-Account Strategy, FinOps Center is designed to facilitate the management of your AWS Cloud Estate via the Delegated Admin Account. A Delegated Admin account may already be created and configured in your Cloud Estate while you setup various AWS Management and Security services like Security Hub.
FinOps Center uses the Cost and Usage report that is created in the Management Account and replicated to the Delegated Admin. FinOps Center was designed to work in conjunction with the CUDOS framework which is a requirement to be installed prior to the FinOps Center installation.
To subscript to FinOps Center, you the subscription needs to be initiated and installed from the Designated Admin Account.
(We recommend that you keep instances with previous AMI until the upgraded installation is confirmed to be working properly. If recovery is required - you can restart the EC2 instance with the prior AMI which will update the CDK bucket with that version. Follow below instruction.)
Marketplace customers will receive an email that their is a new version of the FinOps Center AMI available. The AMI will be available in their EC2 Console for launch leveraging the same IAM Profile used during initial installation. The launched instance will update the FinOps Center cdk bucket with the updates. Select the FinOpsCenterStack.template.json and update the CloudFormation Stack with the object URL.
Click to Zoom
Click to Zoom
Validate the Parameters and advance through the next few screens and hit update.
Upon Completions, Code is Updated.
FinOps Center's Front End Application is deployed and served through S3. To prepare for the installation, an S3 bucket needs to be created, an SSL Certificated needs to be provisioned, a CloudFront Distributions needs to be setups, and lastly the CloudFront Distribution needs to be configured in your DNS to redirect your specific Domain Name of your FinOps Center.
1.Create and S3 Bucket for the FinOps Center REACT Application
Set up the bucket within the designated AWS Account for installing the FinOps Center, managed by Delegated Admin/CloudOps. Configure the bucket for static website hosting and enforce blocking of public access. Also, include index.html as both the Index and Error Document.
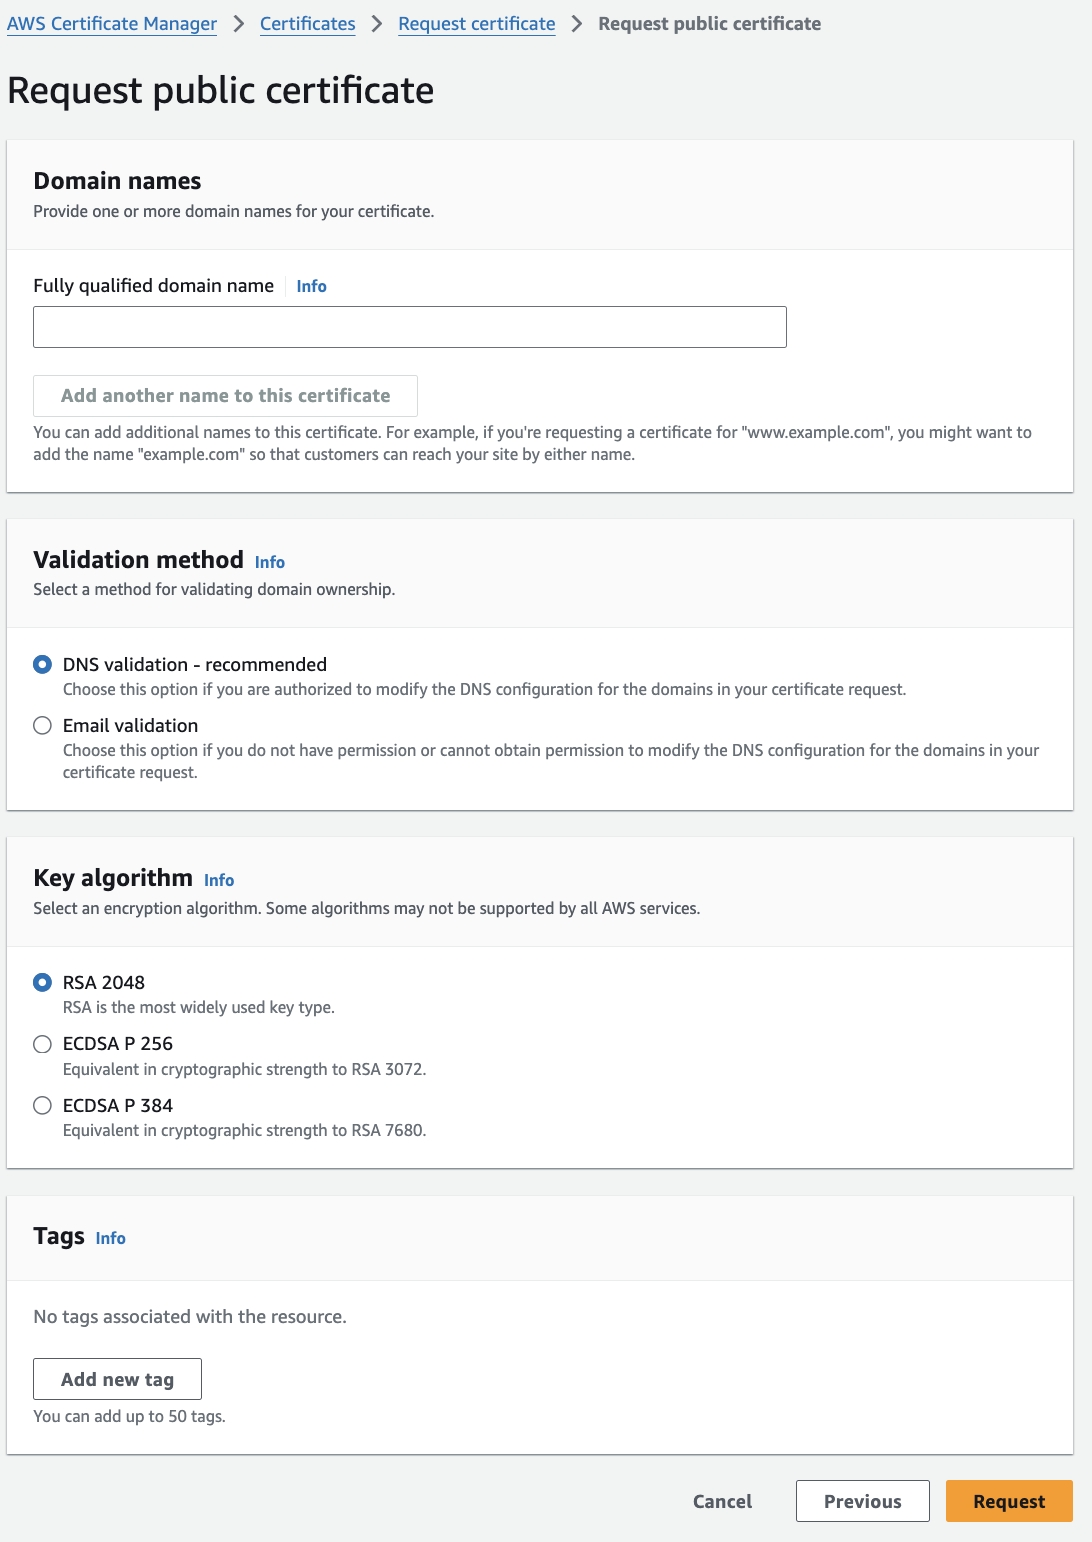
2.Create SSL Certificate for the FinOps Center Application
We recommend using AWS Certificate to create your SSL certificate for FinOps Center due to integration with CloudFront. Like any of your other web application, the Fully qualified domain name for your FinOps Center needs to be knows prior to requesting certifcate.
Click to Zoom
Once the certificate is approved, it will be accessible in CloudFront. To proceed:
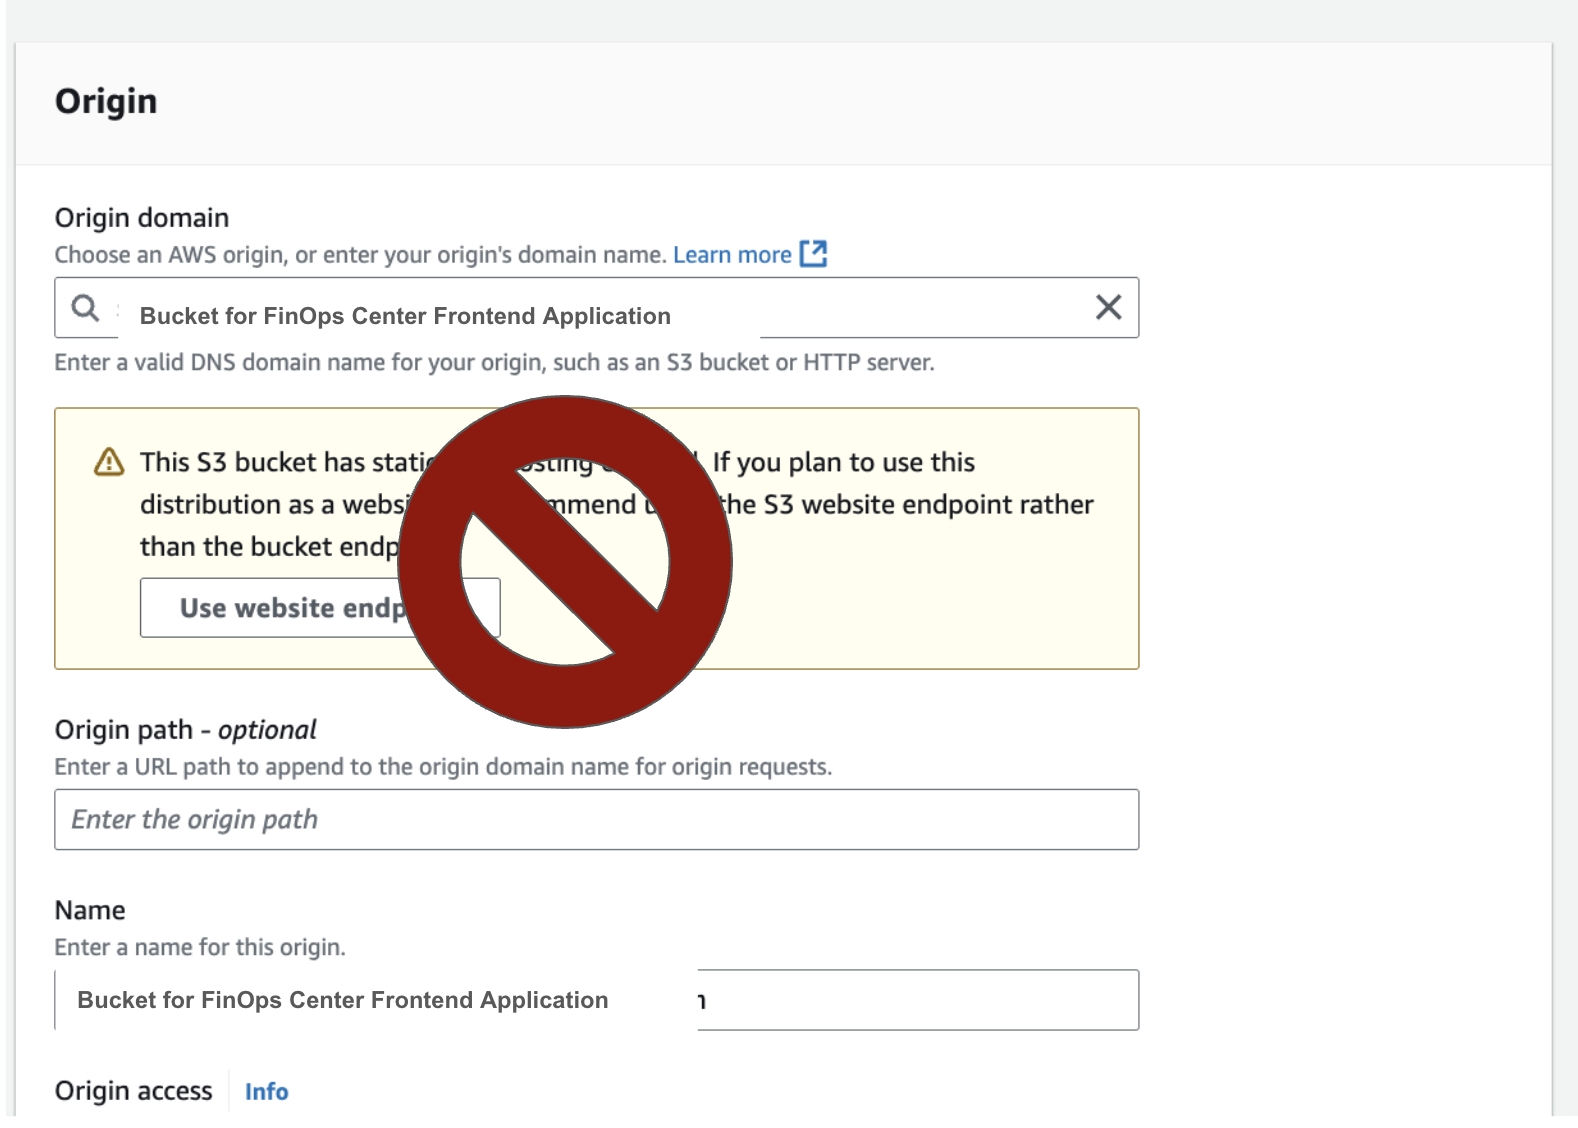
3.Go to CloudFront and initiate the creation of a distribution.
4.Choose the S3 bucket created for deploying the FinOps Center (Note: Do not select the Use Website Endpoint option).
Click to Zoom
5.For Origin Access, opt for the second option: Origin access control settings (recommended), and create a control setting using the bucket defaults. Set Sign Request/Origin Type as S3, then proceed to create.
Click to Zoom
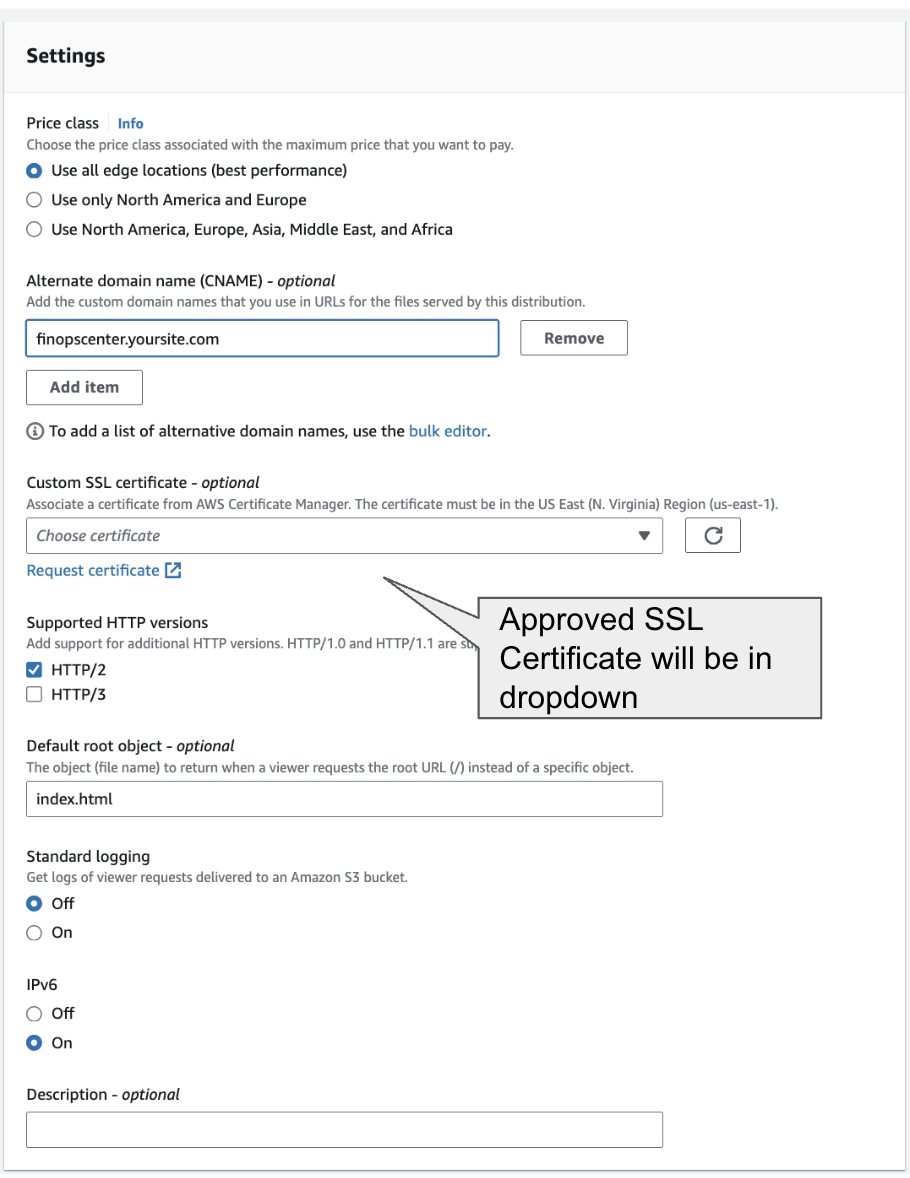
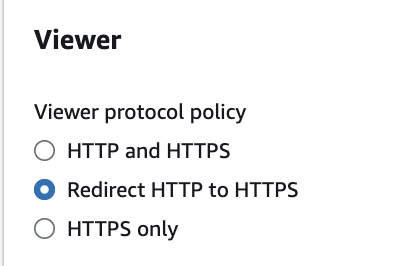
Ensure to update the specified settings below, unless instructed otherwise, while leaving the rest as default.
Update Viewer
Web Access Firewall
Click to Zoom
6. Create Distribution (When the Distribution is Create the CloudFront Homepage will have the Updated S3 bucket policy that needs to be applied to the S3 Bucket -> copy to be applied to bucket. (Note: The distribution may take 5 minutes or so to create, work on Step 9 and 10).
7. Navigate to the Error Page Tag and Config as detailed below. (Note: If uses raise issue that when they refresh page it doesn't load its likely because the Error Page Configuration is Missing)
8. Set invalidation for the distribution
9. Navigate to the S3 Bucket for FinOps Center Application and to Permission. Edit Permission with the Policy from CloudFront
10. Navigate to Route 53 or Domain Controller and Create an A Record that is Domain Name of your distribution
FinOps Center creates IAM Roles and Policies. The Engineer deploying must have Administrative Privileges. (DO NOT INSTALL USING ROOT USER)
Upon Selecting Next you will be taken to the YAML form to complete the FinOps Center Installation.
Name Stack: No Requirements
Environment Parameter:
Bucket of CUR
Path to CUR Date - name/name/name/
Athena DB Created by CUDOS Framework
CUDOS will create cid_cur name
Table name based on CUR creation naming
Provide S3 Bucket for Frontend Application Install
Organization Roles
Define your Organization Role Names
Create your First Admin User and Email
Via CSV
The Chart of Account /Budget Files is a comma delimited file (csv). The hierarchy of file goes from left to right with the top or your organization being the left column to the lowest product/project in the 4th column. The First Row of the file will drive the labels of the application.
Sample File:
File Name
The Chart of Account File should be generated from your Core Accounting System that reflects your Hierarchy and Approved Budget Spending for AWS.Budgets (via file format) can be updated based on Customer requirements.
Customer_2025_true_2025-11-01_false_Budget_v1.csv
The New Account Onboarding Process for FinOps Center is facilitated by access to the Account Management API in the Management Account. Within an AWS Cloud Estate, one account can be configured to be Delegated Admin and is the account FinOps Center is installed.
Steps to Create Delegated Admin if not created
Creation of New Account - Customers are advised to create an account (if not existing already) that requires Delegated Admin privileges, particularly for services like Security Hub and Systems Manager. While the naming convention is flexible, this account is referred to as the CloudOps Account by Cloud Scal3.
Enablement via Security Hub- Follow the instructions provided for enabling an account to be delegated Admin via Security Hub Setup. This involves configuring the Delegated Admin Account through Security Hub.
By following these steps, the integration for Account to Budget onboarding through FinOps Center is facilitated efficiently and securely.
2025
effectiveYear - sets endDate to 2023-12-31. If isNew = true, startDate will be overridden to 2023-01-01
true
isNew - sets startDate to effectiveYear-01-01 and reloads the budgets
2025-11-01
startDate - sets when the budget becomes active. Must be 1st of month
false
isOverride - if you want to replace the existing entries, clears the database for given effective year and creates new entries
Customer Option
None
v1
None
I am a CCoE User and I want to create a New Budget for All Project for the New Budget Year.
I am a CcoE User and I want to up to update a Product’s Annual Budget on 7-01-XX
I am a CCoE User and I want to add a New Product and it’s budget
Chart of Account Integration
Admin users upload the Chart of Account File in the Configuration Page. The Chart of Account File is uploaded in the *.sorfile s3 Bucket and processed by Lambda into DynamoDB.
Invoice Integration
CCoE and Business Unit Users will be able to download csv to their desktops for integration into Core Financial and/or FP&A Solutions.
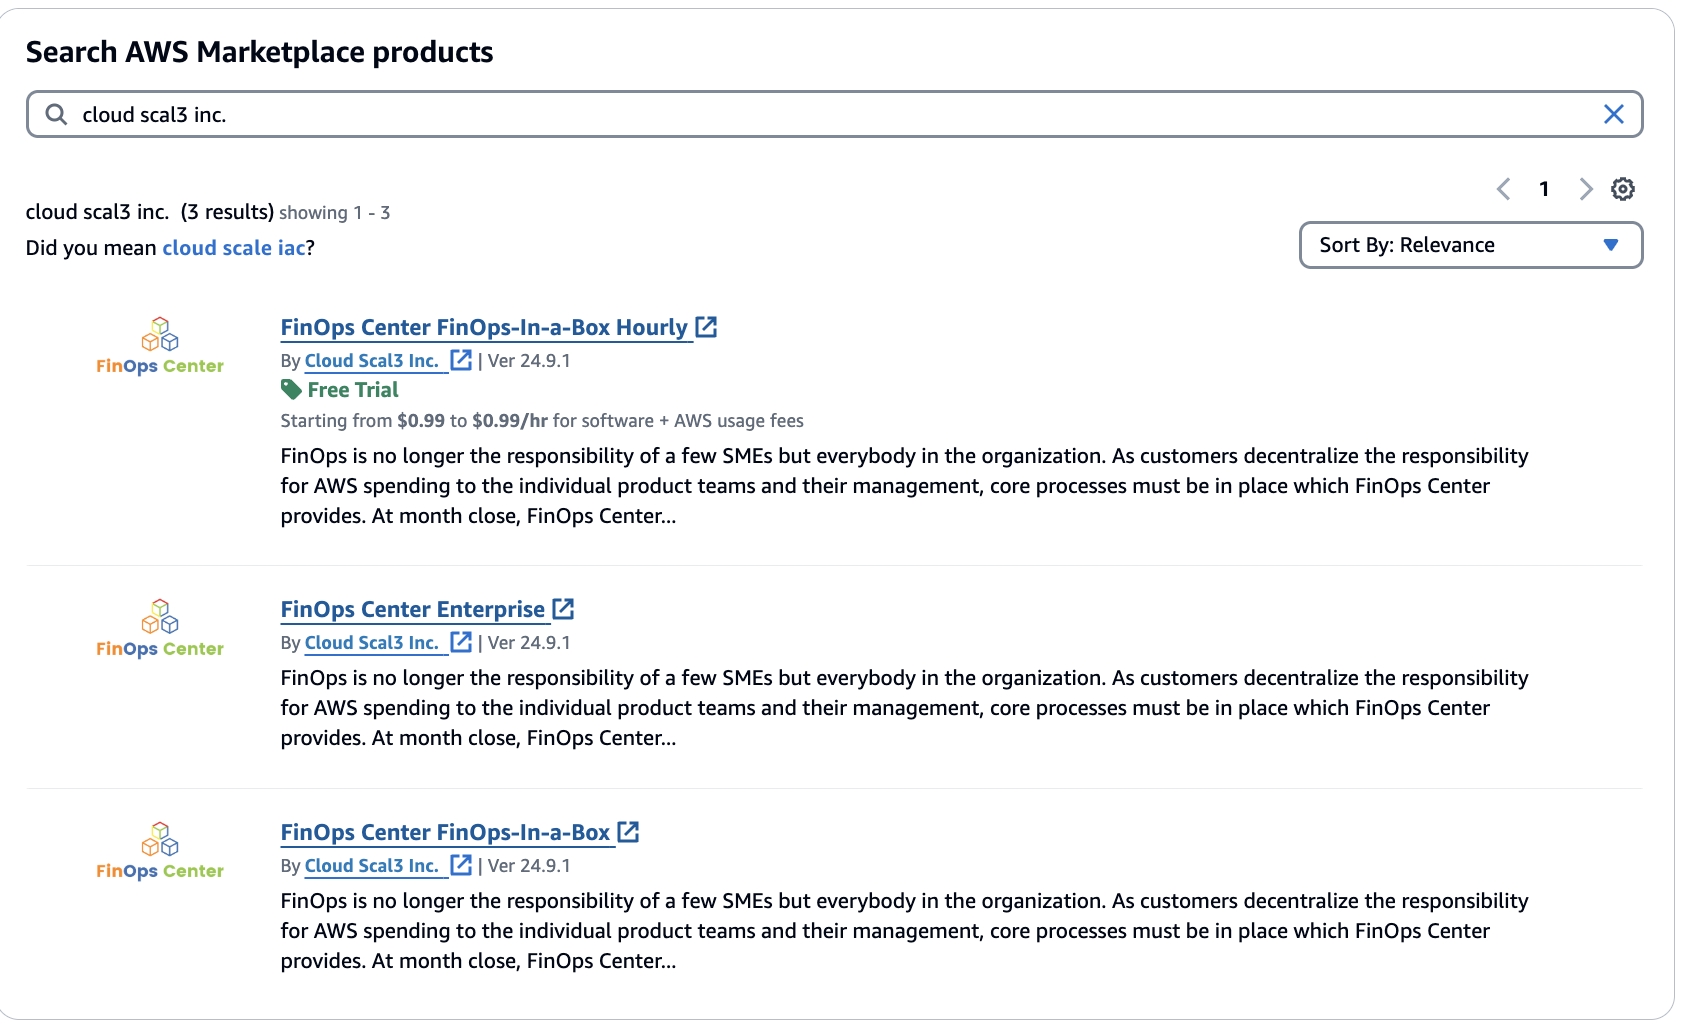
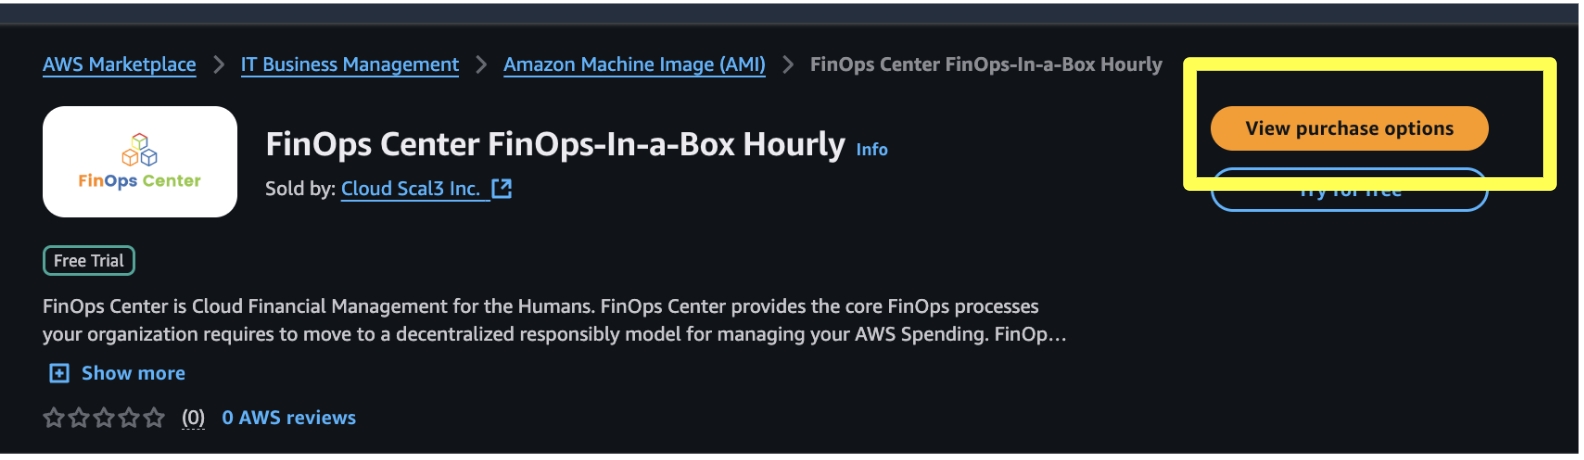
Navigate to the AWS Marketplace and Search for FinOps Center (FinOps-in-a-Box or Enterprise Versions)
Click to Zoom
ATTENTION: FinOps Center will be deployed from CloudFormation via S3. The below instruction will create an EC2 deployment via and AMI. Upon creation, the EC2 instance will create the bucket with the CloudFormation Scripts and JSON to be used in lunch in CloudFormation. Upon completion (when the bucket and packages are deployed) the instance that is created can be shut down. During the installation, a EC2 Role needs to be created with IAM Scope defined below to enable the creation and copying of files for the CloudFormation Installation.
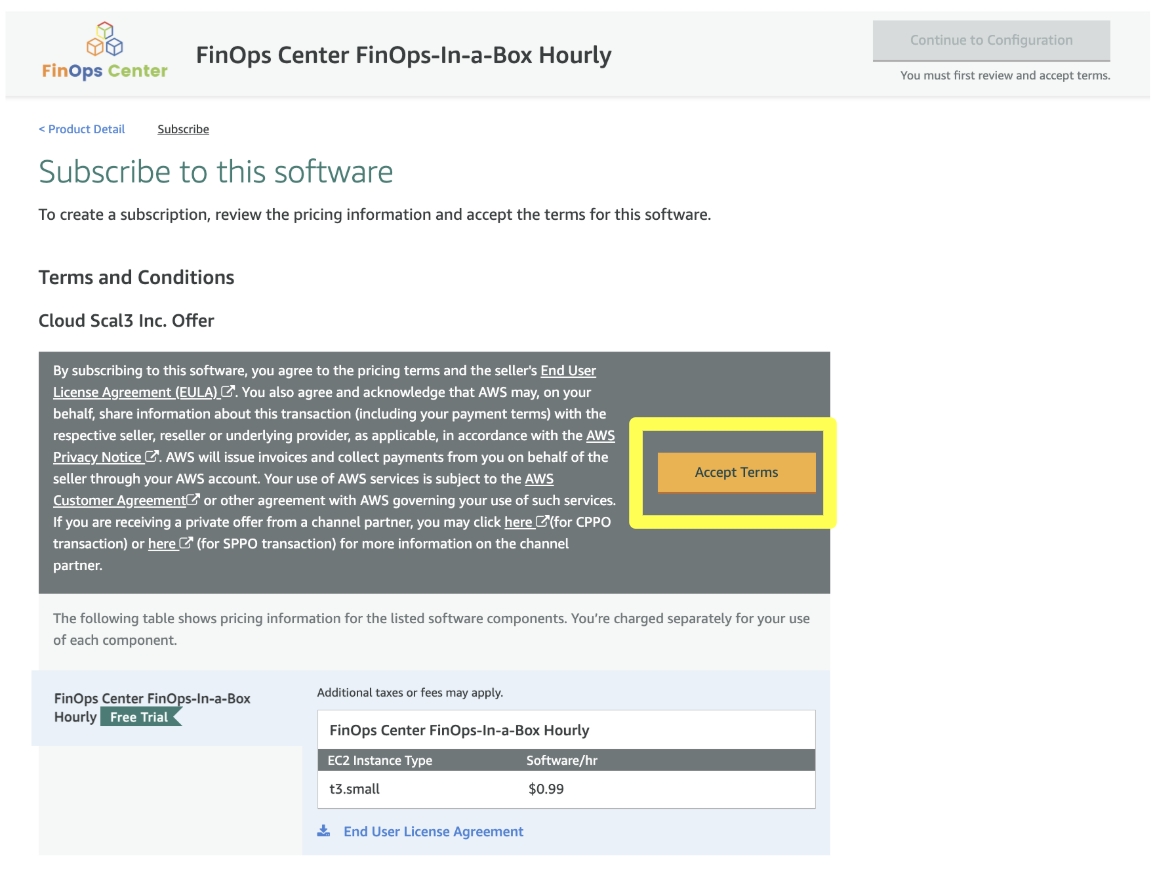
Continue to Subscribe
Click to Zoom
Accept Terms
Click to Zoom
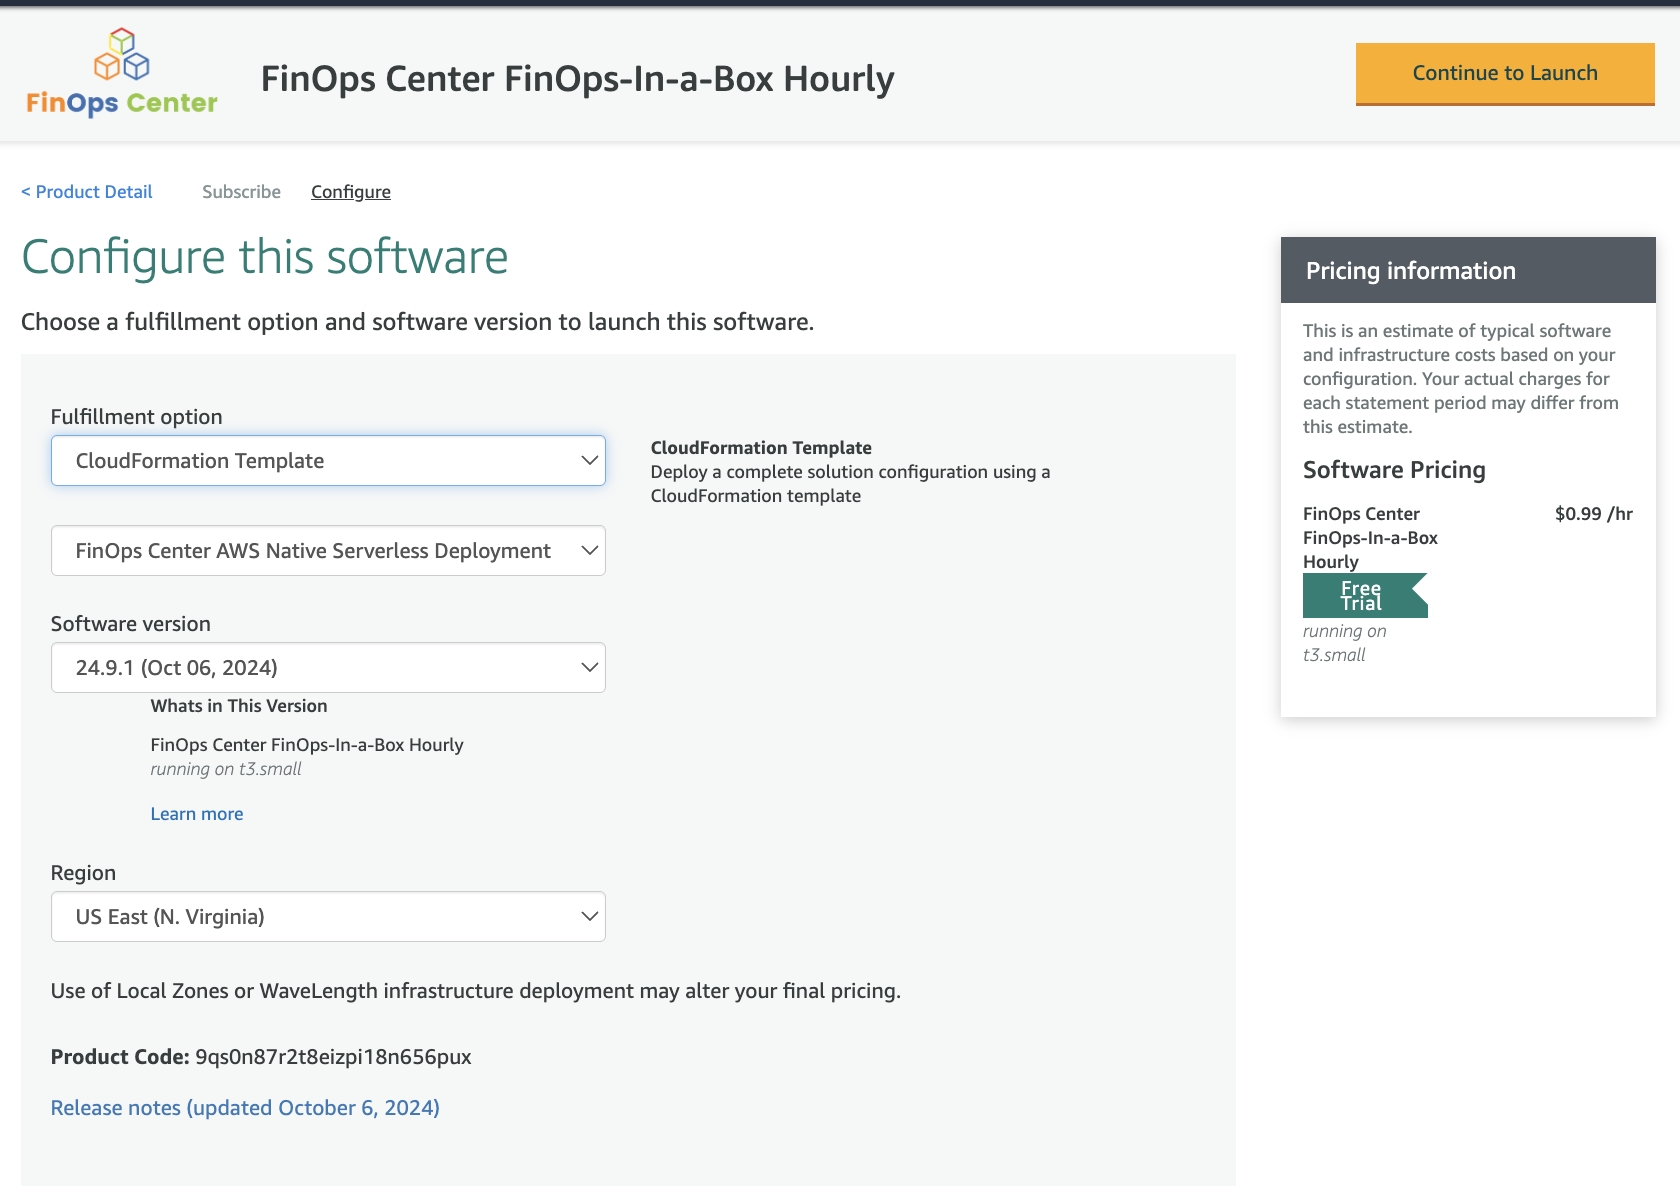
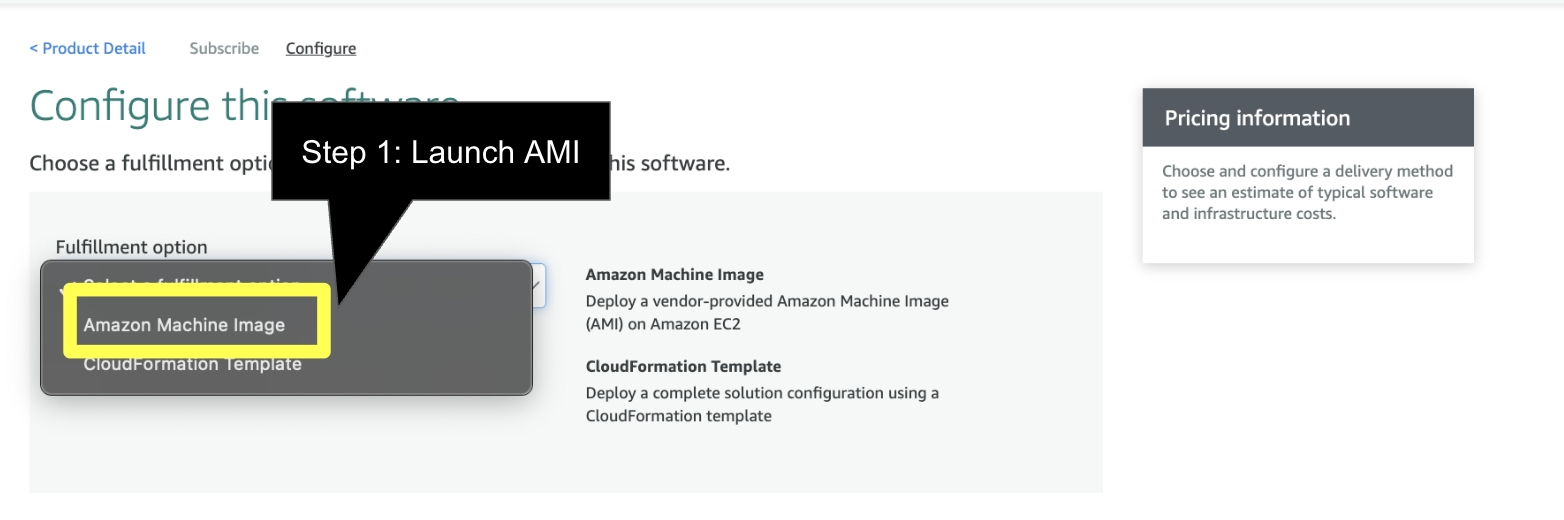
Select Continue to Launch
Click to Zoom
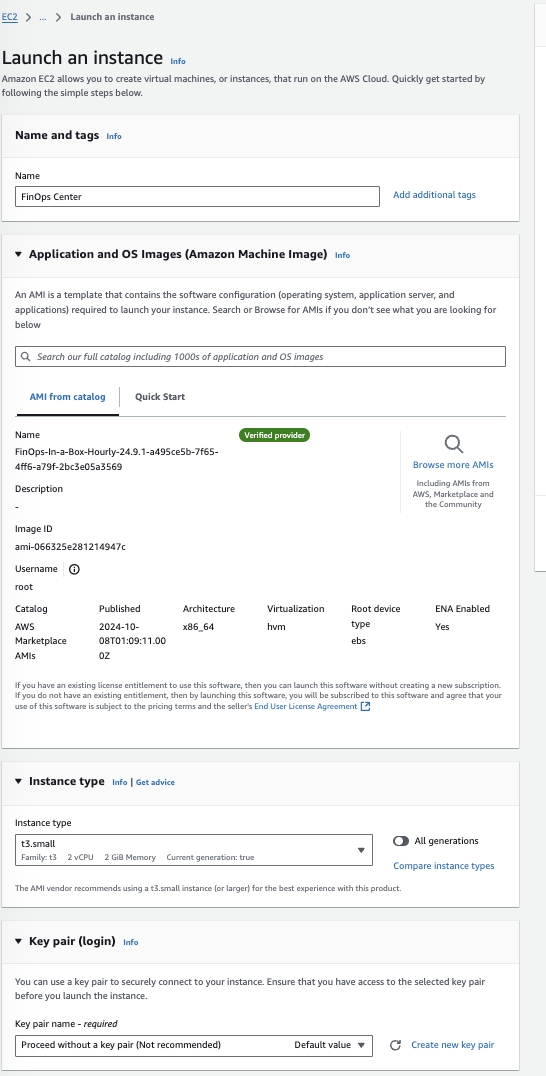
Launch through EC2
Click to Zoom
Click to Zoom
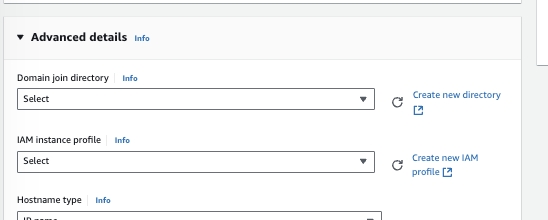
Configure Instance to your companies standards. As note previously, the EC2 instanced provisioned is used to copy files to S3 for the FinOps Center deployment. We recommend a small instance (T3 Small) be used and can be shut down once the files are copied to S3.
Click to Zoom
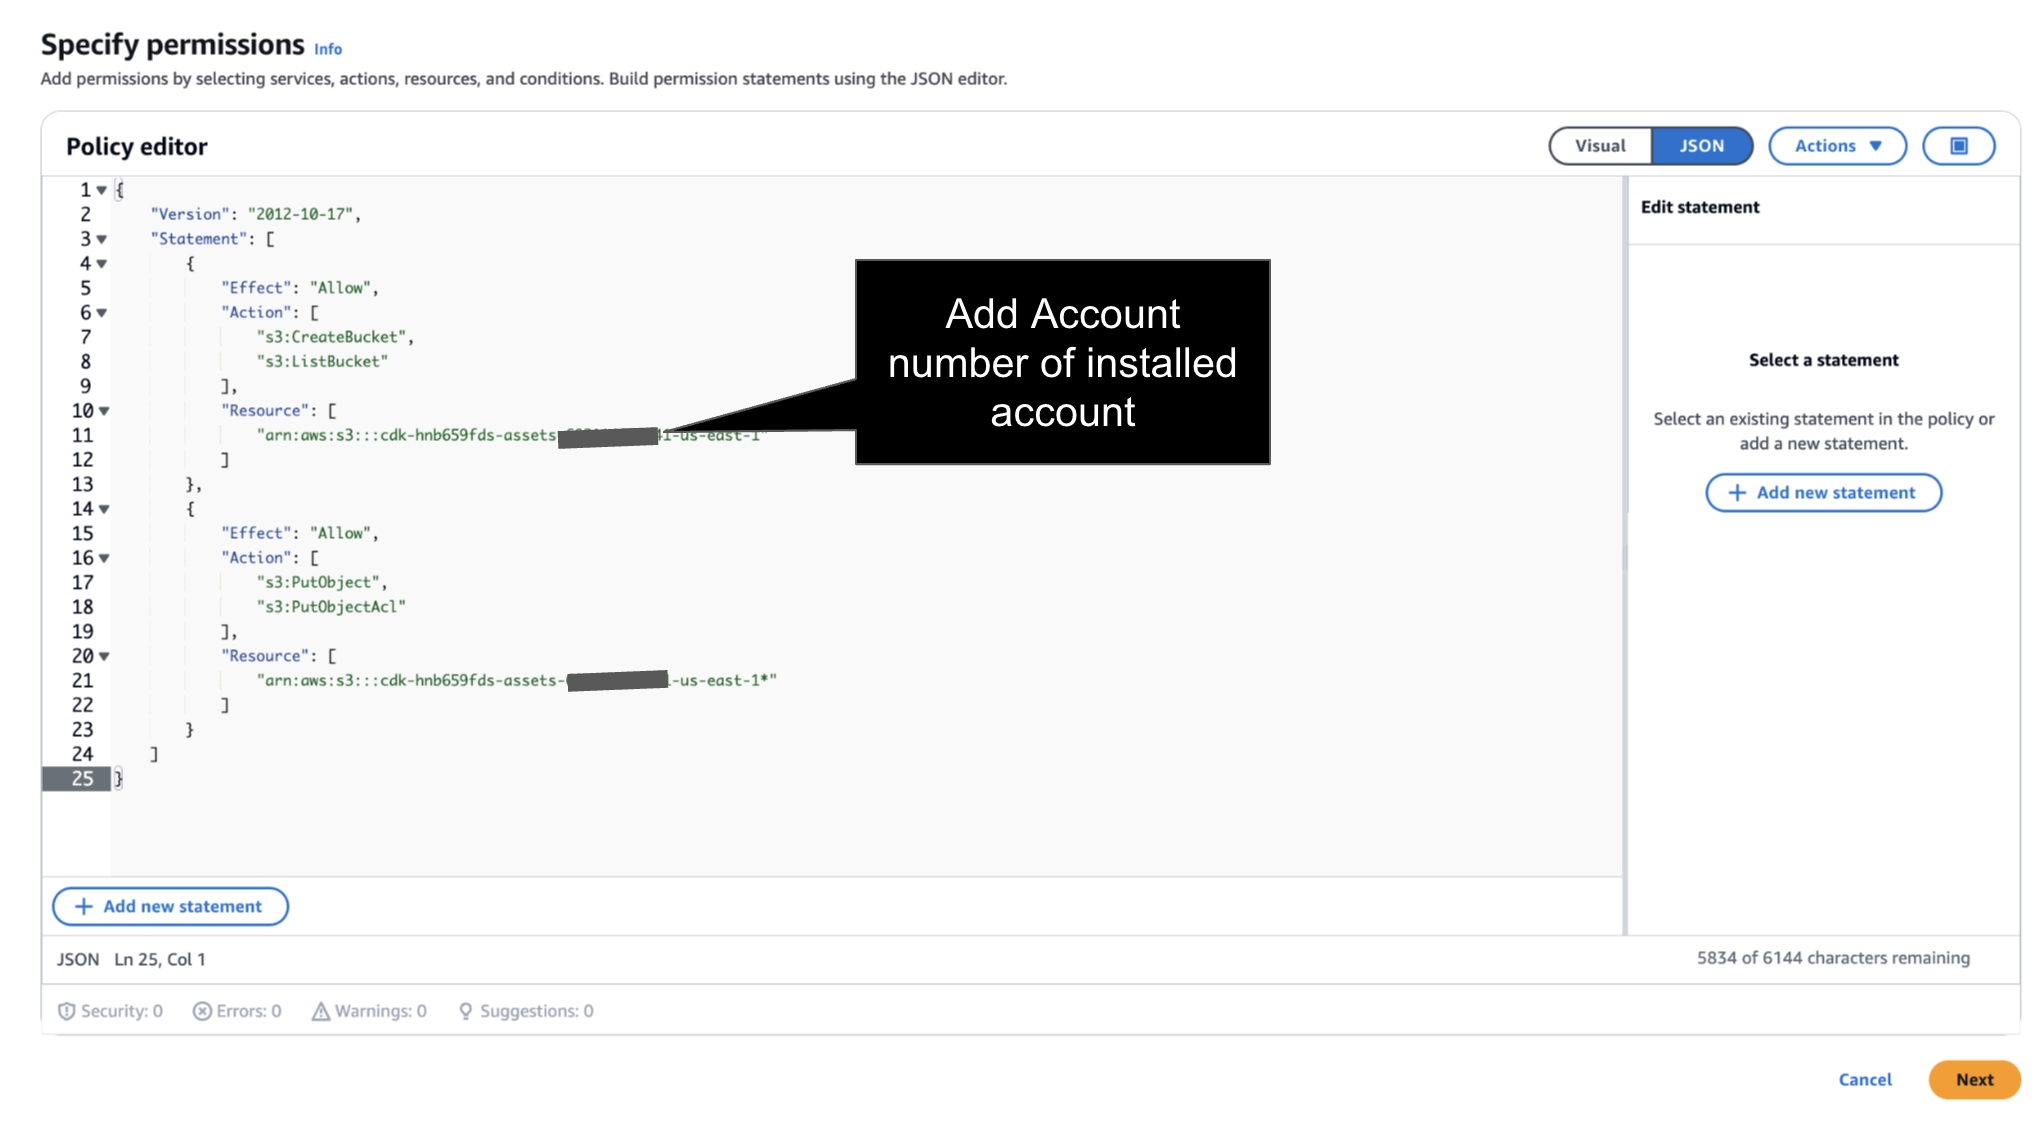
Prior to Launch → the IAM Instance Profile much have a Role with Policy to S3 Create Bucket and S3 Write Access for FinOps Center Installation Bucket. Add your AWS Account Number to below Policies.
Navigate to IAM and follow below Steps
Step 1: Create a New Role for EC2 or Validate an Existing Role has above Policy.
Click to Zoom
JSON Policy - add account number of installed account.
Step 2: Create a Role
Click to Zoom
Step 3: Add Policy to Role
Click to Zoom
and Create Role
Click to Zoom
Return to EC2 to Launch Instance
No Key is Required as the Instance can be delete upon Install
Launch Instance
Navigate to S3
As the EC2 starts up, a bucket will appear beginning with cdk (see below)
Once you see the cdk Bucket is created navigate back to the Marketplace Listing to Launch CloudFormation.
Launch CloudFormation
Click Next
Note: All environment installation are “ Fresh Installs”. There is no separate installation pipeline between SDLC environment.
cdk-xxxxxx-assets-accountnumber-us-east-1
US East (N. Virginia) us-east-1
Bucket and objects not public
Timestamp
{
  "Version": "2012-10-17",
  "Statement": [
    {
      "Effect": "Allow",
      "Action": [
        "s3:CreateBucket",
        "s3:ListBucket"
      ],
      "Resource": [
        "arn:aws:s3:::cdk-hnb659fds-assets-<accountnumber>-us-east-1"
      ]
    },
    {
      "Effect": "Allow",
      "Action": [
        "s3:PutObject",
        "s3:PutObjectAcl"
      ],
      "Resource": [
        "arn:aws:s3:::cdk-hnb659fds-assets-<accountnumber>-us-east-1*"
      ]
    }
  ]
}